


How to Calibrate Xbox One Controller?

Are you having trouble getting your Xbox One controller to work properly? Don’t worry, you’re not alone. Many gamers have difficulty calibrating their Xbox One controllers and getting them to perform as expected. Fortunately, there is a straightforward process you can use to get your controller calibrated and working properly. In this article, we’ll explain how to calibrate your Xbox One controller in just a few simple steps. Read on to learn how to get your controller up and running in no time!
To calibrate your Xbox One controller, make sure you have an up-to-date version of the Xbox One console software. Then, connect the controller to your console via a USB cable, and press the Xbox button to turn it on. Next, press the menu button on the controller and select Settings, followed by Devices & Accessories. Finally, select the controller you want to calibrate and choose Calibrate Controller.
- Make sure you have an up-to-date version of the Xbox One console software.
- Connect the controller to your console via a USB cable, and press the Xbox button to turn it on.
- Press the menu button on the controller and select Settings, followed by Devices & Accessories.
- Select the controller you want to calibrate and choose Calibrate Controller.
What is Xbox One Controller Calibration?
Calibrating an Xbox One controller is a simple process that only takes a few minutes of your time. It is important to calibrate your controller in order to ensure that it is functioning properly and that you are getting the most out of your gaming experience. Calibrating your controller allows you to adjust the sensitivity and accuracy of your controller, as well as ensure that all of the buttons are working correctly.
The calibration process is not difficult or complicated, but it is important to follow the instructions carefully in order to ensure that the process is done correctly. This guide will provide step-by-step instructions on how to calibrate your Xbox One controller so that you can get the most out of your gaming experience.
Steps to Calibrate an Xbox One Controller
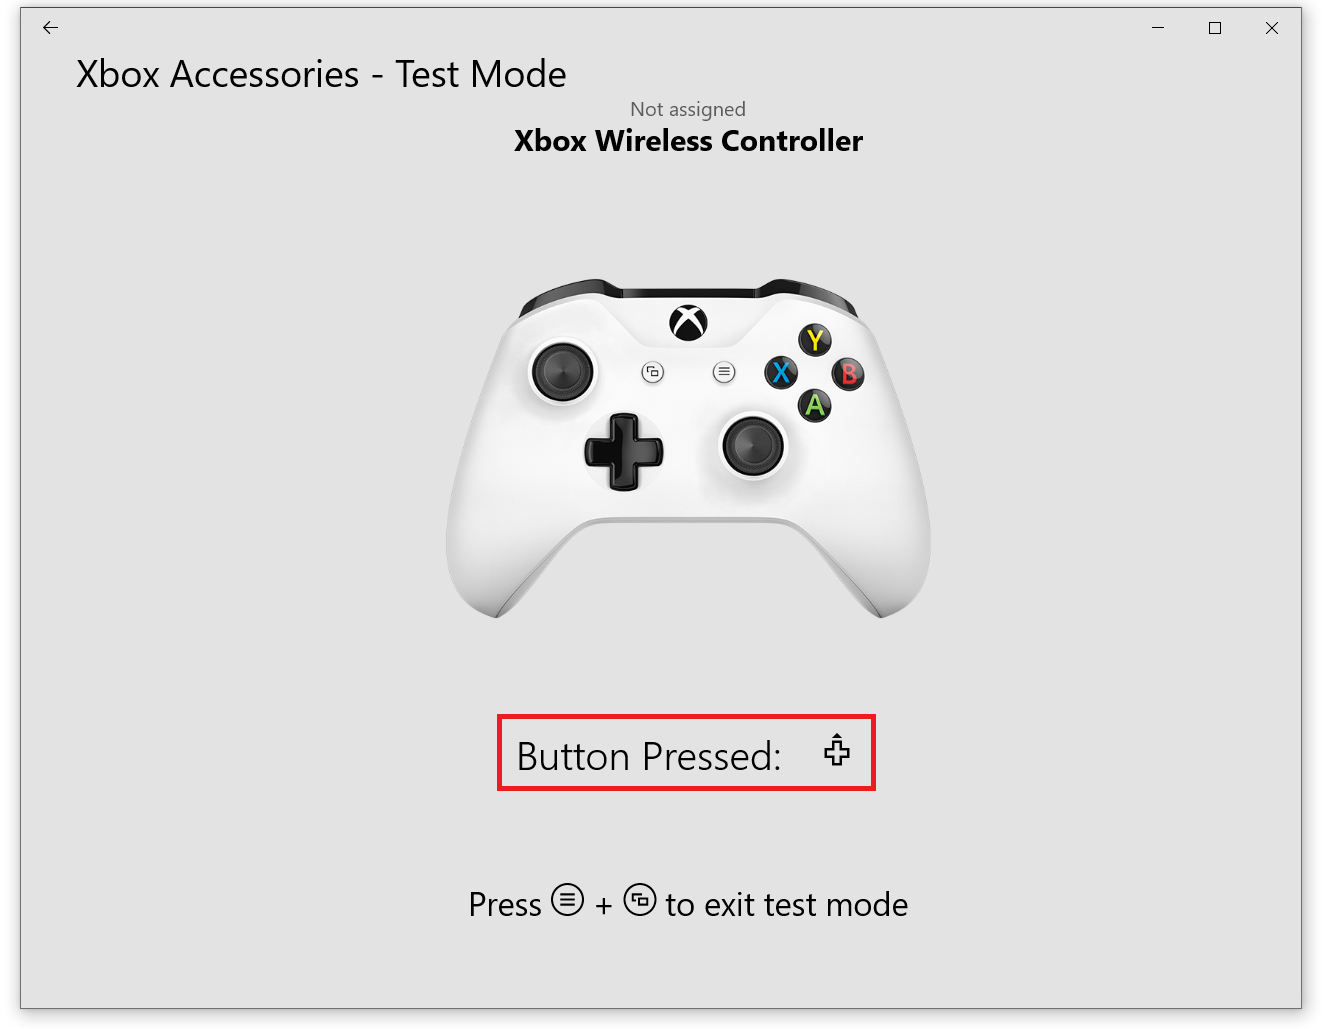
The first step in calibrating an Xbox One controller is to open the Xbox Accessories app. This app will allow you to adjust the sensitivity and accuracy of your controller, as well as map the buttons to your liking. Once you have opened the app, you will need to select the “Calibrate” option.
Once you have selected the “Calibrate” option, you will be prompted to press the “A” button on the controller. This will open up the calibration menu. From here, you will be able to adjust the sensitivity and accuracy of the controller, as well as map the buttons to your liking.
Once you have adjusted the settings to your liking, you will need to press the “B” button to save the settings. After this, the controller should be calibrated and ready to use.
Troubleshooting Xbox One Controller Calibration
If your controller is still not functioning properly after calibration, there are a few things you can do to troubleshoot the issue. The first thing you should do is make sure that the batteries are properly inserted and that they are charged. If the batteries are not properly inserted or if they are low on charge, this could cause the controller to not function properly.
If the batteries are properly inserted and charged, then the next thing you should do is check the connections. Make sure that the controller is firmly connected to the console and that all of the cables are properly connected. If the connections are loose or if the cables are not connected properly, this could cause the controller to not function properly.
If the connections are secure and the cables are connected properly, then the next thing you should do is check for any software updates. Make sure that the console and the controller are both up-to-date with the latest software. If the console or controller is not up-to-date, this could cause the controller to not function properly.
Checking Xbox One Controller Settings
Once you have checked the batteries, connections, and software updates, the next step is to check the controller settings. You can access the controller settings by opening the Xbox Accessories app. From here, you will be able to adjust the sensitivity and accuracy of the controller, as well as map the buttons to your liking.
Once you have adjusted the settings to your liking, you will need to press the “B” button to save the settings. After this, the controller should be calibrated and ready to use.
Testing Xbox One Controller Calibration
The final step in calibrating an Xbox One controller is to test it out. Once you have calibrated the controller, it is important to test it out to make sure that it is functioning properly. You can do this by playing a game or using an app that requires the use of the controller.
If the controller is functioning properly, then the calibration was successful. If the controller is not functioning properly, then you may need to go back and adjust the settings or try troubleshooting the issue.
Conclusion
Calibrating an Xbox One controller is a simple process that only takes a few minutes of your time. It is important to calibrate your controller in order to ensure that it is functioning properly and that you are getting the most out of your gaming experience. The calibration process is not difficult or complicated, but it is important to follow the instructions carefully in order to ensure that the process is done correctly. Once you have calibrated the controller, it is important to test it out to make sure that it is functioning properly.
Top 6 Frequently Asked Questions
What is controller calibration?
Controller calibration is the process of ensuring that the inputs from the controller, such as buttons or triggers, are correctly registered by the console. This is especially important for games that require precise input, such as sports or fighting games. Controller calibration can be done manually or through the console’s settings.
How do I calibrate an Xbox One controller?
To calibrate an Xbox One controller, open the Xbox Guide Menu and select Settings. From there, select Accessories, then select the controller you wish to calibrate and select Calibrate. You will then be taken to a screen displaying the Xbox One controller’s analog sticks and buttons. Follow the on-screen instructions to complete the calibration process.
What is the calibration process?
The calibration process begins with the controller’s analog sticks. The user is prompted to move the sticks up, down, left, and right to ensure that the console is accurately registering the inputs. After this, the user is then prompted to move the sticks in a circular motion to ensure that the controller’s dead zone is set correctly. Finally, the user is then prompted to press the various buttons on the controller to ensure that the console is accurately registering their inputs.
What are the benefits of calibrating the Xbox One controller?
By calibrating your Xbox One controller, you can ensure that the console is accurately registering your inputs. This is especially important for games that require precise inputs, such as sports or fighting games. Calibrating your controller can also help to reduce controller lag, allowing for a smoother gaming experience.
What happens if I don’t calibrate my controller?
If you do not calibrate your Xbox One controller, you may experience issues with controller inputs not being registered correctly by the console. This can lead to issues such as inputs not being registered correctly in-game, or the controller behaving erratically.
What should I do if I am having trouble calibrating my controller?
If you are having trouble calibrating your Xbox One controller, the first thing you should do is check the controller’s batteries to make sure they are properly charged. You should also make sure that the controller is properly connected to the console. If you are still having trouble, you can try resetting the controller by pressing the Xbox button and the sync button at the same time for 3 seconds. If you are still having trouble, you can contact Xbox customer support for further assistance.
Detect and Recalibrate Controller Stick Drift On PC and Console
Calibrating your Xbox One controller is a great way to make sure it is working properly. With the right steps and the right tools, you can calibrate your Xbox One controller in minutes. Not only will you get the best response from your controller, but you’ll also be able to play your favorite games with greater accuracy. With a few simple steps, you’ll be ready to take your gaming experience to the next level!