


How to Auto Archive Emails in Outlook?

Do you want to take control of your inbox and keep it organized? If so, auto archiving emails in Outlook is a great solution. Auto archiving allows you to automatically move emails from your inbox to a designated folder, freeing up space and helping you prioritize incoming emails. In this guide, we’ll show you how to set up auto archiving in Outlook and get the most out of this useful feature. So, let’s get started!
Auto Archive Emails in Outlook: To auto archive emails in Microsoft Outlook, first open Outlook and go to the File tab. Then select the Options tab, followed by Advanced in the left panel. Under the AutoArchive tab, you can select the time period you want to archive, and the folder that you want to save emails in. You can also choose to archive emails older than a set time period. Once you have made your changes, press OK. Your emails will now be archived automatically.
How to Automatically Archive Emails in Outlook?
Outlook is an email client that is used by many businesses and individual users. It provides a powerful set of features, including the ability to automatically archive emails. This is a great way to keep your inbox organized and free up space. This article will explain how to use Outlook’s auto-archive feature to archive emails.
Auto-archiving is a feature in Outlook that allows you to automatically move emails from your inbox to an archive folder. This helps to keep your inbox organized and free up space. You can set up auto-archiving to occur on a daily, weekly, or monthly basis. It is also possible to choose which folders to archive and which emails to include.
Setting Up Auto-Archiving
To set up auto-archiving, open the File menu in Outlook and select Options. From the Options window, select Advanced and then click on AutoArchive Settings. This will open the AutoArchive Settings window, where you can configure your auto-archiving preferences.
The first option to configure is the frequency of archiving. You can choose to archive emails daily, weekly, or monthly. You can also choose whether to archive items manually or based on the age of the items. The age can be set to any number of days, weeks, or months.
Choosing Folders to Archive
Next, you can choose which folders to archive. You can select any number of folders from the list. All emails in these folders will be archived according to the frequency you have set. To include subfolders, you can select the Include Subfolders option.
Selecting Emails to Archive
You can also choose which emails to archive. You can choose to archive all emails or only emails that are older than a certain number of days, weeks, or months. You can also choose to archive emails based on their importance or sensitivity.
Additional Settings
The AutoArchive Settings window also has some additional settings that can be configured. These include where to store the archived emails, whether to delete them after archiving, and whether to back up the archived emails.
Creating an Archive Folder
Before auto-archiving can be enabled, you must first create an archive folder. To do this, open the Folder List and select the New Folder option. Give the folder a name and select the Archive folder type. You can then click OK to create the folder.
Enabling Auto-Archiving
Once the archive folder has been created, you can enable auto-archiving. To do this, open the File menu in Outlook and select Options. From the Options window, select Advanced and then click on AutoArchive Settings. This will open the AutoArchive Settings window, where you can configure your auto-archiving preferences.
Testing Auto-Archiving
Once you have set up auto-archiving, you should test it to make sure it is working properly. To do this, send a test email to yourself and wait for the auto-archiving to occur. If it does not occur, check your settings to make sure everything is configured correctly.
Manually Archiving Emails
In addition to auto-archiving, you can also manually archive emails. To do this, select the email or emails you want to archive, right-click and select Move to Folder. This will open a list of folders where you can move the emails. Select the archive folder and click OK.
Using Rules to Automate Archiving
In Outlook, you can also use rules to automate archiving. Rules allow you to set conditions for when emails should be archived. For example, you can create a rule to move emails from a certain sender to the archive folder. To create a rule, open the Rules pane and select Create Rule.
Using Outlook’s Cleanup Tool
Outlook also has a built-in Cleanup tool that can be used to delete unwanted emails and archive older emails. To access the Cleanup tool, open the File menu in Outlook and select Cleanup. This will open the Cleanup window, where you can select the emails you want to delete or archive.
Related FAQ
What is Auto Archive in Outlook?
Auto Archive in Outlook is a feature that automatically moves old emails from an Outlook mailbox to an archive folder. Auto Archive helps to keep the Outlook mailbox from becoming too large by periodically removing emails that have been in the mailbox for a certain amount of time. This feature can be customized to archive emails after a certain period, move them to a specific folder, or to never archive them.
How do I turn on Auto Archive in Outlook?
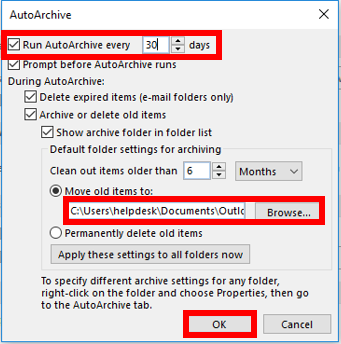
To turn on Auto Archive in Outlook, open the Outlook application and go to the “File” tab. Select “Options” and then go to the “Advanced” tab. Scroll down to the “AutoArchive” section and check the box next to “Run AutoArchive every
How do I customize Auto Archive in Outlook?
To customize Auto Archive in Outlook, open the Outlook application and go to the “File” tab. Select “Options” and then go to the “Advanced” tab. Scroll down to the “AutoArchive” section and click on the “AutoArchive Settings” button. Here, you can customize the age of emails to be archived, the folder to which the archived emails will be moved, and whether or not to delete expired items. Once you have made the desired changes, click “OK” to save them.
Can I turn off Auto Archive in Outlook?
Yes, you can turn off Auto Archive in Outlook. To do this, open the Outlook application and go to the “File” tab. Select “Options” and then go to the “Advanced” tab. Scroll down to the “AutoArchive” section and uncheck the box next to “Run AutoArchive every
How do I manually archive emails in Outlook?
To manually archive emails in Outlook, open the Outlook application and go to the “File” tab. Select “Archive” and then select the folder or folders that you want to archive. You can specify the age of emails to be archived and the folder to which they should be moved. Once you have selected the desired settings, click “OK” to archive the emails.
What happens if I delete an item that has been archived?
If you delete an item that has been archived, the item will be deleted from its original location, but will remain in the archive folder. You can access the archived item by going to the “File” tab in Outlook and selecting “Open & Export”. Here, you can select the archive file and view the archived items.
How to Set Auto Archive Emails Outlook (2022)
If you’re looking for an easy way to keep your Outlook inbox organized, auto archiving emails is a great solution. This process helps you keep your emails organized and helps you focus on the most important emails in your inbox. With the few simple steps outlined in this article, you can easily customize auto archiving emails to suit your own needs. So, start auto archiving emails in Outlook and take back control of your inbox!