


How to Use Signature in Outlook?

If you’re looking for a way to make your emails look more professional, adding a signature to Outlook is a great way to do it. With a signature, you can quickly add contact information or a company logo to the bottom of each message you send. In this article, we’ll discuss how to use signature in Outlook, so you can easily customize and add signatures to your emails.
How to Use Signature in Outlook?
- Open Outlook and click the File tab.
- Next, select Options and then Mail.
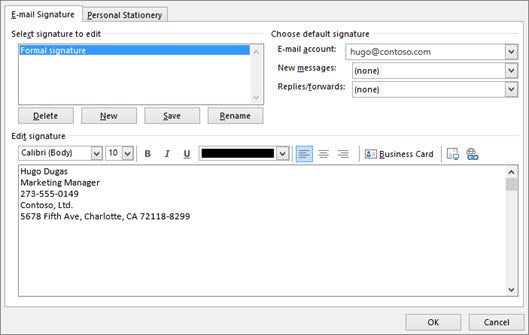
- Scroll down to the Signatures section and click the New button.
- Create your signature. You can add text, images, your electronic business card, a logo, and even an image of your handwritten signature.
- When finished, click the OK button.
- If you want to use the signature, select it from the Choose default signature section.
How to Add Signature in Outlook
Adding a signature to your Outlook emails is a great way to make them more professional and interesting. A signature is a small block of text that is automatically included at the end of every email you send, displaying your name, contact information, and other relevant information. This article will explain how to add a signature to your Outlook emails in just a few easy steps.
The first step is to open Outlook and go to the File tab. From there, select the Options tab and then select the Mail tab from the navigation menu. This will bring up the Mail Settings window, where you can create your signature. Scroll down to the Signature section and click the “New” button to create a new signature. Give your signature a name and then enter the text you want to include in the signature.
Once you’ve added all the text you want to include in the signature, click the “OK” button to save it. You can then choose which signature to use when sending emails by selecting it from the “Signature” drop-down menu. You can also choose to have Outlook automatically insert your signature into all your outgoing emails or just some of them.
Customizing Your Signature in Outlook
Once you’ve created your signature, you may want to customize it to make it more eye-catching and personal. You can do this by clicking the “Edit” button in the Mail Settings window, which will open the signature editor. Here you can change the font, size, color, and other formatting options to make your signature stand out. You can also add images and hyperlinks to your signature to make it more interesting.
It’s also possible to add HTML code to your signature, which will enable you to add background images and other advanced formatting options. To do this, click the “HTML” button in the signature editor and then enter the code you want to use. When you’re finished, click “OK” to save your changes.
Managing Your Signatures in Outlook
Once you’ve created and customized your signature, you may want to manage it so that it’s easy to access and use. To do this, go back to the Mail Settings window and select the Signatures tab. Here you can easily manage your signatures, rename them, delete them, or create new ones. You can also choose which signature to use by default when sending emails.
Using Different Signatures for Different Accounts
If you have multiple Outlook accounts, you can easily set up different signatures for each one. To do this, go to the Mail Settings window and select the Accounts tab. Here you can select the account you want to create a signature for, and then click the “Signatures” button to open the signature editor. Create a signature for the account and then click “OK” to save it.
Testing Your Signature
Once you’ve created and customized your signature, you’ll want to make sure it looks the way you want it to. To do this, go back to the Mail Settings window and select the Test Signature tab. Here you can type in an email address and click the “Test” button to see a preview of what your signature will look like in an email.
Creating a Stationery Template
If you want to use the same signature for all your emails, you can create a stationery template. To do this, go to the File tab and select the Options tab. Then select the Mail tab from the navigation menu and scroll down to the Stationery and Fonts section. Here you can create a template with your signature and other formatting options that can be applied to all your emails.
Using Signature Shortcuts in Outlook
If you want to quickly insert your signature into an email, you can use signature shortcuts. To do this, go to the File tab and select the Options tab. Then select the Mail tab from the navigation menu and scroll down to the Signatures section. Here you can select the signature you want to use and click the “Shortcut” button. This will create a keyboard shortcut that you can use to quickly insert your signature into emails.
Few Frequently Asked Questions
Q1. What is an Outlook signature?
A signature in Outlook is a block of text or images that can be added at the end of an email message. It usually contains the sender’s name and contact details, such as their address, phone number, and email address, as well as their website or social media links. Adding a signature to emails can help give a professional look to emails and establish a consistent identity for the sender.
Q2. How do I create a signature in Outlook?
To create a signature in Outlook, open the Outlook app, then go to File > Options > Mail. Under the ‘Signatures’ section, click on the ‘Signatures’ button. This will open a new window where you can create a new signature.
First, type in a name for the signature. Then, you can type in the text or images that you want to include in the signature. When you are done, click on the ‘OK’ button at the bottom of the window to save the signature.
Q3. How do I add a signature to an email in Outlook?
To add a signature to an email in Outlook, open the Outlook app, then create a new email or reply to an existing one. At the bottom of the message, click on the ‘Signature’ button. This will open a drop-down menu where you can select the signature that you want to add to the email. Once you have selected a signature, it will be automatically added to the email.
Q4. How do I edit an Outlook signature?
To edit an Outlook signature, open the Outlook app, then go to File > Options > Mail. Under the ‘Signatures’ section, click on the ‘Signatures’ button. This will open a new window where you can edit an existing signature. Select the signature that you want to edit and then make the necessary changes. When you are done, click on the ‘OK’ button at the bottom of the window to save the changes to the signature.
Q5. How do I remove a signature from Outlook?
To remove a signature from Outlook, open the Outlook app, then go to File > Options > Mail. Under the ‘Signatures’ section, click on the ‘Signatures’ button. This will open a new window where you can delete an existing signature. Select the signature that you want to delete and then click on the ‘Delete’ button at the bottom of the window. The signature will then be removed from Outlook.
Q6. How do I add an image to my Outlook signature?
To add an image to your Outlook signature, open the Outlook app, then go to File > Options > Mail. Under the ‘Signatures’ section, click on the ‘Signatures’ button. This will open a new window where you can create a new signature. Type in a name for the signature, then click on the ‘Insert Picture’ button. This will open a file explorer window where you can select an image that you want to add to the signature. Once you have selected an image, it will be automatically added to the signature. When you are done, click on the ‘OK’ button at the bottom of the window to save the signature.
How to Add Signature in Outlook
Using signature in Outlook is a great way to personalize your emails and add a professional touch. It allows you to quickly add contact information, a company logo, or a personalized message at the end of each email. With a few simple steps, you can easily create a signature that is unique to you and helps your emails stand out from the rest. So take the time to customize your signature and make sure your emails make the right impression.